Wednesday, August 29, 2012

D2R2 2012


The Story:

  As the day approached, my nerves were on edge. Last year CP, GS and I had ridden the full 180k D2R2, and the second half was very hard for me. I gave up on the Corn Maze then, a short, delightful cool-down on an optional spur past the finish, but which I think is officially a part of our 180km route. One could build an excuse around hurricane Irene which had been drizzling on us for the last 10mi, and which would submerge the dining and parking areas under a foot of mud by morning. But really, last year's ride simply beat me and I couldn't wait to get off the bike as soon as the finish was in sight.
  Two days before the start, the forecast mentioned thunderstorms and I told another rider that if that threat persisted I'd drop out. Completing the full ride would establish my new longest ride ever, and since most of the miles are on dirt roads, a storm ride sounded too hard.
  The morning of the ride, I woke naturally, 15 minutes before my 2:30 alarm, after some overnight tossing at the sound of thunderstorms. I thought again of CP who was in a tent at the start sleeping through this weather. A quick kale omelette and an nearly two hours of driving through drizzle got me to the start a little ahead of my plan, where I met CP for some food. I was feeling pretty good and decided to ride with CP until I fell off his pace. We had plenty of time to get ready for the 6:00 start time, and CP had a chat with Sandy, the dirt road guru and fan of covered bridges who designed the various routes of the event. I would learn through the day that CP knows many of the people here. The drizzle was tapering and Sandy predicted that in an hour the weather would clear. We're off!
  Riding through Deerfield, MA at the start, we're on paved roads. CP immediately met Ca, a friend and fellow bike racer, and we became a group of three. A fourth joined the back and the conversation picked up. Ca told me about her ride last year with a friend who went on to win an important race the week after D2R2. We took a left over a long bridge which I didn't recognize, but our fourth said he was sure is correct. I tried to keep up with my cue sheet, listing the turns and distances, because D2R2 has almost no signs on the road. But inevitably I lost track as Ca and I traded stories, until my odometer said we were past the point of a T intersection I didn't see. By the time we backtracked to the correct trail, we'd enjoyed a 6.5 mile detour on relatively flat pavement. But we also landed behind a large number of riders who started after us but kept to the route.
  On the first hard climb, Ca pulled ahead of me and that was the last I saw of her until dinner after the finish.
  CP and I snaked up and down beautiful roads through forests and along farmland as the sky gradually lightened. While there were a couple wet areas on the gravel roads, I noticed that the moisture bound them together everywhere else so the dust and shifting stones of past years were gone. Climbing traction was perfect throughout the day.

  After the famous "bobsled run" descent and over a short bridge, the cue sheet said hard right, and I vaguely remembered it from past years, but a pair of Jersey barriers closed that road. Another rider suggested a detour and I was able to confirm it with my GPS. Just after rejoining the cue route, we came upon a wire strung across the road and a small herd of cattle crossing just past it. A farmer was moving them to pasture and had a temporary fence system to guide them over the pavement. After they all crossed he took down the wires and we resumed.
  After a water stop and a few more hills, we found the base of Archambo Rd. This may be the most famous tiny dirt road around, because it boasts a 27% climb, steepest grade of D2R2. I've learned a couple bits of physics about this slope. Even pro riders cannot start a bike on this, so once a foot goes down the rider walks to the top, as does everyone stuck behind him or her. Second, the rider must stay in the saddle or else the rear will slip and a foot goes down. Loose gravel will also cause a slip, and my first attempt 2 years ago scraped up both of my elbows that way. CP and I rode without other riders for miles after the water stop, guessing the clump we saw got stuck in the water line they had created there. But they swept along with us a mile or two before Archambo, so they hit the the steep ahead of us and all were on foot by the one-quarter mark. I dropped into my ultra-low gear and managed to stay on the saddle, but a clot of walkers blocked all of the road just ahead. I tried to say "let me through," but it sounded like a soft mumble mixed with my gasping for breath. CP came up behind me and called out properly, opening a path for us and he accelerated through the gap. That was the most impressive display of strength I saw all day.
  In past years I walked the last half of Archambo, but the solidly wet gravel and my lower gearing got me all the way up. I might have given up at around 2/3 of the way, but a pair of cheerleaders there with ersatz trumpets encouraged us to stay with it. Too soon after that came an endless and steep climb that takes it out of me every year. Two years ago a cheerful stranger in a wool jersey told me that climb is the worst of the whole ride in his opinion, though most give Patten Hill that title. I now agree with him.
  Then the difficulty moderated and I was enjoying the break when I recognized  DB, a friend who was on a different D2R2 route with a group of other friends. I hadn't realized we were near lunch, but that's where all the routes converge, beside a red covered bridge in Vermont. We all rode together for the rest of the way, parked our bikes and enjoyed the unusually nice meal there.
  The long climb immediately after lunch felt unnecessary, but a chocolate-covered espresso bean and another story with CP got us to the top and we were back into the ride. After a while there's a segment that makes me laugh, where we divert off a major road, go through a covered bridge then over two other bridges and rejoin the same road - an obvious longcut. But I'd forgotten that we almost encircle a beautiful old cemetery between the bridges, and I was moved to connect with those stones. And I did it in pigeon sign language in case CP was watching, and because silence felt right. I pointed to my chest, then to the headstones, then held up four fingers - one for each brief decade (max) which separates us.

  This route is the only place I've ever ridden such long and tiring descents that I want to rest before bottom. Picture endless swooping gravel, where the rider must be vigilant for rock, ruts and potholes. In fact, there were places where we passed groups stopped to fix flats, lining both sides of the road! Yet the most fearsome of these is reserved for the end of the ride, which many call the 'mountain bike descent'.
  But first we arrived at the base of Patten Hill, site of misery last year. One school of thought is this beast should be ridden as three individual climbs, separated by spans of less-steep climbing. But this year my gearing got me up the first (paved) section, and the damp gravel got me up the rest. Nearly to the water stop at the top, my homemade aluminum cue sheet holder broke off, certainly a victim of metal fatigue on the dirt descents. It fit nicely in my jersey pocket for the rest of the ride, and I felt lucky it didn't snap off at much higher speed.
  Several slices of watermelon later, we were into the last segment of the ride, well ahead of last year's pace and in line with CP's informal goal for the finish. Early in the 'mountain bike descent' I built up confidence in bunny-hopping rocks and small erosion trenches, and took small jumps off the tips of boulders sticking through the surface. I decided I could hop anything there and eased off the brakes, swiftly passing a more cautious rider. Then a trick of the light hid the scale of a large erosion cut until I was nearly upon it, so my hop was late and underpowered. I managed to get the front wheel onto the road surface but the rear fell way short - ka-toom! After a moment's recovery, a roar escaped me, reasserting dominance over the road, and I finished the descent without further trouble.
  Back on the pavement of Deerfield town, CP dropped down with his forearms on the bar, casual time trial style. I asked if he wanted to push to the finish and he said yes, shooting for an even 12 hours wall time. We missed that target by 3 minutes, then looked for our friends who had already finished dinner and gone home. Then we tacked on the corn maze which I found I could almost ride from memory of two years ago. And we were done.

The Stats:

  Miles: 121 horizontal, 3 vertical.
  Hours: 10:25 moving, ~12:20 wall. (11.6 MPH moving avg)

Technical Jargon:

  This year I brought full mountain bike gearing, with a 22:34 low gear. In past years I kept my road crank, yielding 26:34, but I needed lower to finish in relative comfort. Last winter it struck me that if I used the parts my MTB is currently wearing out, the long-term cost of the drivetrain for this ride is almost zero - it's all spare parts for the MTB. Top gear is 44:11 which was plenty. Changing over all this (twice!) for one ride is a lot of overhead for one ride, since it requires changing out the bottom bracket, front derailleur, chain guide and all the rest. I wouldn't do it for any other event.
  I've long been praising my frame for versatility, an Independent Fabrication  Club Racer built around Shimano long-reach caliper brakes. It can be stripped down to a competent road configuration or can carry full SKS fenders over wider tires for winter commuting in reasonably good weather. But it only barely fits the 32mm Vittoria Cross EVO XG tires I used for this ride. I was sure I couldn't get fenders over those tires, until I mounted them the day before the ride, listening to the radio forecast of possible thunderstorms, and noticed there was some room under the brake arms. The fenders rubbed the tires badly at first, but after some persuasion with a heat gun and other adjustments I was happy with them and that's what I rode. At almost the last minute I noticed the front derailleur arm would crash into the fender in low gear, so I shifted into that position and got out the heat gun again, while pushing the fender forward over the derailleur. After it cooled and I let go, the fender sprang back a little to give the derailleur just enough clearance, and the fender retained a perfect bend to accept it. Custom fit!
  Those tires are the same ones I've used for all 4 D2R2s I've ridden, plus about two prep rides each year. At this point the center knobs of the rear tire are nearly worn flat, but I think that was perfect for this year's wet conditions. I never needed rear knobs, and the remaining thin smooth contact strip was quite efficient. Knobs remain on the sides and front center, all helpful for cornering and stopping. I ran 72 PSI rear, 60 front, slightly higher than last year because of my fear of pinch flats. But standing pedal work felt bouncy enough that I wondered several times whether I was loosing air and should add some. Even after the ka-toom, the tires held air perfectly, so it's good that I never did add any air. I really like all the Vittoria tires I've tried. Count me lucky they don't make mountain bike tires, because I go through those faster than anything else and Vittoria prices would be rough. (And if they do make MTB tires, don't tell me!)

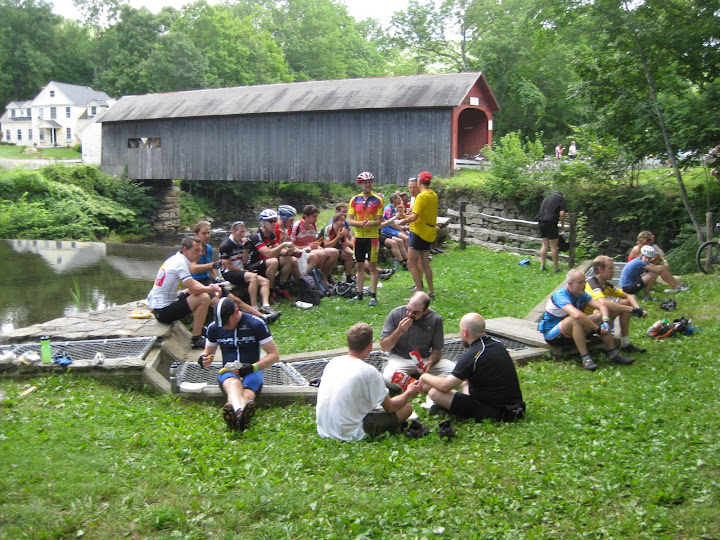
* Top picture is by CP, impressive camerawork while climbing! Foreground rider 448 is your humble scribe.

Monday, December 13, 2010

Spoke Tools


The first phase of wheelbuilding can use a screwdriver-like tool to tighten the spoke nipples, and this is much faster than the later phase using a spoke tool. The classic screwdriver tool looks like a regular screwdriver bent into a right-angle Z. I have no doubt that a seasoned builder could use such a tool with admirable efficiency, but as an occasional builder I haven't tried to find one.
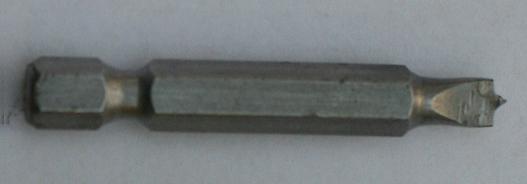
Instead, I ground down a standard hex screwdriver bit, as shown. I used the edge of the grinding wheel to leave a pin in the center, which fits into the spoke hole in the center of the nipple. This works far better than a standard screwdriver bit because it keeps the bit centered and allows the bit to hold the nipple fairly well. (This shape is borrowed from the classic tool.)
I like this bit a lot. Its small size makes it a nice handle for inserting the nip and engaging the spoke, then a finger-roll or two engage enough threads to move on to the next. I can't think of a tool design that would make this process faster.
Later, after all spokes are installed, I use the bit to perform initial tensioning, until I need more torque than fingertips can provide. Then I put the bit into a small ratchet driver and work until that too becomes slow. Then the rim strip goes on for safety and I switch to the standard spoke tool which works on the flats exposed next to the spoke (and visible in a finished wheel).

Sunday, December 12, 2010

Spoke Lengths

It finally happened: I laced a wheel with the wrong length spokes. I noticed just after lacing, before any time spent tightening, but still a costly mistake in time and money.
The main culprit is the database in the on-line calculator tool I found. I believe it thinks an M756 rear hub is centerlock, but it has the large flanges that come with an ISO rotor mount. I share the blame, though, because I didn't check the dimensions before I bought the spokes.
In the good old days, say around 2000, there was a functioning on-line community in rec.tech.bicycles which put together accurate and complete tools for this as contributions to the world. These days profit-seeking seems to have destroyed those tools and replaced them with hit-and-miss or deliberately incomplete tools.

I bought the first set of spokes from an LBS which cuts and threads spokes to length. While this ensures the length is correct, the cut ends are very sharp and the threads less clean than the factory rolled ones. They're also more expensive, perhaps due to the labor of cutting.
At the second shop, I asked them to check my revised calculations. This is the most modern shop I deal with, in the sense that I get good response to email. Their calculation was even more wrong than my original set. This time I think the rim size was incorrect, though the lookup matched the sticker on the rim itself! I got a look at the calculation process at this shop, too. For the last decade or so, I've used spreadsheets or web calculators, and electronic databases of dimensions for the hubs and rims. Here there was a programmable Casio calculator taped and zip-tied to the inside cover of a binder holding pages of dimensions. (I suspect much of these are out-of-date by now.)

In the end I re-learned the old saw, measure twice, cut once.

Tuesday, November 9, 2010

Mystery of Shimano Tall Flanges

I really like Shimano hubs. They've served me well for over a decade, through all sorts of bad weather and other abuse. I have looked to them for my relatively recent interest in mountain biking (MTB).

(Well, that Nexus internal hub wasn't very reliable, but the freehubs are all I'm interested in these days, and they've all been very good.)

I built up Bumblebee, my current MTB, using their XTR hubs. I like everything about these except one thing, their low flanges. The XTR flanges look like those of a road hub, which is nice for a lightweight hub. However, I think it's bad for a reliable MTB wheel, because both front and back disc-braked MTB wheels run much higher peak torques than (rim-braked) road wheels ever do. For example, the chain drives at least 50% higher torque in an MTB than a road rear wheel: just compare the low gear ratios. And my vote for highest torque in any bike wheel is a disc front.

Torque is conveyed through the spoke web by differential tension: the pull side spoke tension increases and the push side decreases, both to exactly balance the torque between hub and rim. The taller the flange, the smaller the tension changes because they operate over a larger lever. (The most extreme case of this would be if someone built a fully radial rear wheel. With no lever arm at all, the hub would be pulled apart by any significant torque.) In other words, a low-flange MTB hub requires a very good wheel build, and is still more fragile than a less carefully built wheel with a high-flange hub.

The frustrating thing about the XTR hub flanges is that I have an XT rear hub with tall flanges. It's lower-end, weighing almost twice as much as the XTR. But why wouldn't Shimano offer a tall-flange XTR when there is one in XT?

First I noticed that Shimano's centerlock hubs use low flanges while their ISO 6-bolt hubs have high flanges. I tried to turn this into a demographics situation - maybe ISO users are thought to be poor wheel builders?

It hit me the other day riding in: the receptacles for the 6 ISO bolts would cover the spoke holes of a low-flange hub, making the wheel very difficult to build! So ISO hubs need high flanges for the builder's sake, while centerlock ones do not.

My current plan is to use the XTR hubs and just keep after the wheel tension. I think this will work for me - though I wouldn't recommend it for someone doing big drops or very fast descents. And avoid thin spokes! The DT Revolutions I sprinkled in the first build proved to be a real problem here, and I've since replaced them all in the rear wheel.

Wednesday, October 13, 2010

Zipper Insertion


While most of my favorite homemade or modified bike projects come off the milling machine, many are done with a sewing machine instead. My fabric projects fall mostly into two categories, adding reflective tape to road outerwear or improving cool/cold weather clothing. This project is in the latter camp.

I've long enjoyed Nike's running shirts as road undershirts or mountain bike shirts. They make a long-sleeve running shirt that I really like, featuring excellent fabric and visibility. The bright orange is great for hunting season, and it has sleeve reflectors that I'd like to see on my road clothes. The only drawback is that I heat up a lot while riding, and Nike's design has no zipper at all. My favorite road jerseys have full zippers so they can be opened completely when needed.

I decided to add a full zipper to this shirt. I have limited sewing experience and am self-taught since a short class in 7th grade. This project was somewhat tricky because the Nike fabric is a very stretchy synthetic, while basic sewing technique assumes rigid materials that can be ironed, such as cotton. I've been developing some techniques for this over the years, and I have access to a rather good sewing machine for difficult fabrics.

Finding the zipper proved harder than I'd expected. A coarse, jacket-style zipper was easy to find, and that's what I used in the end. I searched the internet for a finer one, more like the excellent one used on Assos jerseys. I couldn't find anything like this, except for a hint that there are more options available for mass-production style work. Maybe another time I'll explore buying continuous zipper by the foot and assembling its termination components myself.

I'm happy with the results. For this project I wanted a wide final stitch to prevent fraying and distribute forces from the stretchy fabric, but the stitch itself doesn't need to stretch because the zipper tape can't. I found a stitch on the sewing machine that I'd never used before, and I really like both its look and technical properties in this application.Like most successful projects, I learned a bit and had fun doing it, then wound up with a piece of equipment that will help me for a long time. All these benefits are the justification for the time spent doing the work.

Monday, August 23, 2010

D2R2 2010


The Deerfield Dirt Road Randonee, or D2R2, is a challenging bike ride in western Mass, riding up into Vermont. Last year was my first time riding it, a 100km (65 mi) ride which was more demanding of my abilities and equipment than any other. It was so much fun that I wanted to try a longer version this year. My goal, if all went very well, was to ride the longer, 180km route to the lunch stop shared by the two routes, then switch to the 100km route for the way home, making a medium-sized route of 93 mi.

Training did not go perfectly, of course, and as the ride approached on the calendar, I wrestled with whether to swap my early start time for the later 100km start. All of my friends from last year's ride either stayed with the 100km route or had to skip it altogether, so the longer ride would also be solo. But a pair of dirt road prep rides went better than I'd expected, and I decided to go for it.

My 4am alarm was unnecessary after I naturally woke at 3:15, and this was a lucky stroke because it took longer than I'd planned to get out the door. Drove 4:25-6:20, watching the sun rise and the temperature drop to 50 degrees F. After weeks of heat, I hadn't imagined it could be cold, so I didn't have any extra layers. After registering, I found a pair of bags the OJ cups had come in, and fashioned them into ersatz arm warmers.

"Sea smoke" floated on the river next to the parking area as I started riding at 6:53. The earliest start was 6, but the organizers wanted untimed folks like me to wait until at least 6:30. I hoped to start about then, so was behind schedule already. But I was determined to ride at a natural pace, to avoid burning out early, so I pushed time out of mind and enjoyed the scenery and some conversation with other riders. One of the main draws of this event is the alternating river and hilltop views of the beautiful rural landscape of the Connecticut River watershed.


The first water stop was at mile 21, where I learned I only needed two (XL) bottles and emptied the third. I also learned that I didn't need the helmet light I was wearing, when two of the staff asked whether I rode to the start before dawn. Later in the ride my neck muscles would also tell me I shouldn't have loaded that weight onto my helmet. A rider next to me commented that he'd already had 3 flats, and was out of tubes and into the patch kit. This was just partway through the first quarter of the ride, designated a warm up!


Randonees don't have marked turns, unlike most big road rides, so cue sheets are very important, and a GPS can be quite helpful. We came to a place where the cue sheet said, "CAUTION: wicked downhill next mile - steep, rutted, narrow, stony". This sounded good to me as I've always enjoyed descending, and this ride feels like a nearly constant climb. After a bit of dirt road descending, a fork was marked with one of the few D2R2 signs of the day. I'd have gone left without it, but saw the arrow, hugged the adverse camber and kept the momentum going right. A little levelling was followed by one of the longest, loosest, fastest descents of the whole day. I thought, 'I'm glad the riders have thinned out so I don't need to worry about other riders here!' as I hung on. I saw bike tracks in the dirt, a reassuring sign, but noted that the path was wavy, as if a roadie were skidding the brakes downhill. I again thanked my cyclocross tires for their wonderful grip. The cue sheet and GPS were beyond illegible with the handlebar's vibration. It crossed my mind that it would be nice to check them, but there weren't any real options since that D2R2 sign, so no chance of error until I passed a little road that had forked right. I stopped slowly as I was still on the loose slope, and the GPS read "U turn when possible". Oh no. I struggled back up the hill to the little fork, and the GPS didn't want me to go there either. Oh no. I had to go all the way back to the D2R2 sign, finding I'd misread the direction of the arrow. I'd backtracked 1.7 miles, including the first walking of the day. When I rode, I wobbled a bit for traction - just like the track I'd seen on the way down! This was not the right way to prepare for the big hill coming soon on the cue sheet.

"15% climb next 3/4 mile", read the cue. I'd been bracing for this all morning, and sure enough, it was a dirt road slog. The next cue included "super steep", which I'd pictured describing the descent which would naturally follow a climb. Nope, it was more dirt climbing, and here I did some more short walks.


A little after the next waterstop lay the most fearsome cue, "27% grade", a dirt climb. The Wednesday before, some friends and I practiced on a local gravel trail and succeeded climbing some very short climbs that were steeper than this, so I had confidence that I could ride this at least for a bit. But the reality today was a tall climb, perhaps 200ft, and a surface of loose dry sand and rounded pebbles. Almost as soon as the slope hit, my rear tire slipped right, tipping me left. I was unable to clip out of the pedals while falling over, so I landed on my elbow and started rolling backward, the bike coming over me. To cut through the frustration, I noted that this was the mirror image of a fall I took Wednesday on a steeper climb, and now both elbows were symmetrically scuffed. After walking around 100ft, the slope seemed to drop just a bit, so I tried again and immediately fell the same way, to the right, re-opening Wednesday's scab. The rest of the climb was a walk, during which I promised myself I'd get rid of these pedals. There were bike tire tracks in the sand, though I can't figure out how anyone could ride it. There were also shoe prints and one hoof print, perhaps from a donkey, the proper vehicle for this road.

At a tiny water stop I started fretting about lunch. It was 1pm, and lunch was to close at 2:30, with 12 miles between. My average speed indicated it would take an hour, but the ride had so many surprises so far that I couldn't bank on that. Mechanical troubles seemed to be plaguing the other riders too, and I couldn't be immune. If this were a novel, you might expect the devil to appear about now, and that's just what happened, though it wasn't clear until afterward. A few turns later, I saw a rider ahead of me take a left, then a pair went right. I stopped and checked cue sheet and GPS and decided the left was correct, so I caught up with the pair and said I thought we should go back and go the other way. The guy in front said, 'this is the quick way to lunch'. What a relief to find a way to stop sweating over missing it! And I'd seen that left led to yet another big dirt climb. But I shook myself out of it and turned back, rejoining the route. I hadn't given up the real route yet! And anyway, I didn't want to have that guy be my only guide to lunch. The more I thought about it the less I appreciated his invitation to join his shortcut.


One gravel descent here gave me what I think of as a "pinch kiss". (If there's a real name for this, please let me know.) It's related to the infamous pinch flat, in which the tire is squished hard against the metal rim by a rock or similar bump, cutting through the inner tube and causing a flat which is difficult to adequately patch. Lots of riders got pinch flats on this ride. A pinch kiss is similar but doesn't cut all the way through the tube, so it's more a warning than a problem. It makes a loud, bad sound like a cartoon kiss. Also, I believe a "kiss cut" is an industrial term for cutting partway through something, like cutting the shape of a sticker without cutting its backing paper.

I arrived at lunch at 2, and there was still plenty of good food. Like last year, the stop was at a covered bridge in Vermont, next to a small waterfall. This is a peaceful spot to eat and rest a little before the long ride back.


Navigation for the return was a bit different, except for the cue sheets. Amy had loaded the GPS with a turn-by-turn route for the first half, investing significant effort converting Delorme data for my Garmin unit. While this was great for many turns, in others the GPS indicated turns that it fabricated, probably due to differences in map details between the companies. Garmin didn't recognize an apparent logging track as a road? I can't say I'm too shocked about that. Anyway, I had no such route for the return. Last year's track, just a colored line on the map, should have helped, but it turned out that track was not loaded, so the GPS did little after lunch. On the other hand, I remembered much of it, so didn't need as much help.

At the end of the 100km ride, there was an optional 5mi flat loop called the "corn maze". (This was a mandatory part of the 180k route.) I don't think it was even available last year. I wanted to ride it, and felt pretty good when I reached it, so I stopped for a quick drink and bite of the sandwich I'd been carrying, and went into it. This was just a ride on the tractor path through a corn field, a fun cool-down after the hills. In the quiet, though, I could hear the grinding of the chain and gears loaded with the day's road grit. I finished at 5:40, getting home before 9:30.


It was a great ride, the biggest of my life. At 8:36 moving time for 103mi (2.4mi vertical), it was about 1.5 times the work of a road century. I recommend it! There are other routes available, down to 40mi flat.

Saturday, December 5, 2009

Russel Mills


After colleagues GC and SM showed me these wonderful trails, I brought E there Thanksgiving weekend. Today was our third ride there, and E has rediscovered the joy of mountain biking.

Thursday, October 29, 2009

Wicked Ride of the East

Sunday was the big autumn ride of the New England Mountain Bike Association (NEMBA). I haven't done one of these before, but after learning some friends were going, I decided to try it. This idea soon started unravelling, as I learned they were planning over double the distance I've ever ridden, and I couldn't line up our start times. I decided to go anyway.

Rain overnight made for a slippery start, over wet roots which tossed all of the group I found myself in. The start was crowded, and it reminded me strongly of a road century ride, so I tried to pass people when possible, to move up toward what I hoped would be a less crowded area. (Like day 2 of the PMC, this start was staggered over time and with random abilities, and I learned on those rides to move up as quickly as reasonable.) But passing opportunities were rare on slippery singletrack. I did see groups stopped at intersections, and moved up in those places. After a mile or two, the trail sped up a bit and the riders did thin out. I found myself riding in front of someone I took to be younger, and I called out some encouragement after he rode over some logs. We parted a little later, but then came an unmarked intersection where I couldn't decide whether to go left or right. At first I followed some folks to the left, but when it started to sound like they didn't know where they were going, I turned around, went past the T and found my log acquaintance looking for the next segment. I saw a sign then and we were back on the trails. (After the ride I learned that I'd gone the wrong way, probably at this intersection, and really rode the second half of the trail instead of the first.)

Harold Parker is a rocky place, mostly a continuous rock garden mixed with rolling short climbs and descents. It's a bad place to get tired because it takes a bunch of power to get up those climbs, even in low gear. If I put a foot down, it was hard to get back on, and efficiency fell way off. I got hot after a couple more miles of this, then wound up riding more conservatively.

Then I found myself at the top of a house-sized steep descent down the side of a huge solid rock. If I'd had more time to look this over I would probably not have dared to ride it, but I was already rolling into it by the time this occurred to me. The back of the saddle grazed my belly as I rode the brakes and tried to keep the front wheel out of any dip - fearing that would easily trigger an endo. Then I realized I had two different signs to read on the way down to stay on the trail! An extra set of eyes would have been handy.

The course was laid out in roughly a figure eight, with the start and end in the middle. I was feeling pretty tired on the approach to the middle and toyed with the idea of skipping the second half. When I realized I was out of water, the decision was made. In total I rode 12.6mi, which is still the longest MTB ride I've done at pace. My friends rode 22, and I'm glad I didn't try that.

At the end I enjoyed the rest of the event: various foods, a booth from a lighting manufacturer and another by Sinister Bikes. At the latter I saw a demo bike with a suspension design so familiar I almost exclaimed "it's a copy of the Heckler!" [by Santa Cruz]. I think the Sinister dudes would not have appreciated that.

It was a good ride and I'd like to try it again. I'll need to train more, though, and preferably on these trails.

Thursday, October 1, 2009

Flight of the Monarch


Bumblebee came with a Monarch 3.3 rear shock, made by RockShox like my favorite forks. Last week I noticed it was leaking air, plus it had smeared out the anodized sag markings, so I contacted the bike shop. At first my sales guy played Mr. Hyde, saying up to 20PSI lost overnight is normal. Then he offered to sell me seals, take a class, or pay them to fix it. After arguing that it's not normal and pointing out it should be under warranty, then reminding him it's a Monarch rather than the more common Fox shock, he became Dr. Jekyll and ordered a free replacement and offering free labor in the shop to swap it. The new one is an upgrade to the Monarch 4.2 (shown above), and it's excellent.

I had thought this was just an air leak issue, and I should fix it to avoid the hassle of refilling the shock before each ride. But it turned out to be far more important. I'd taken the smeared sag marks to be grease shot through the seal, but now I believe it was rub damage from a seal assembled without any grease! (On the internet I've seen others had this problem.) Not only was the shock self-destructing, but the drag was wrecking the suspension action. The bike feels much better with the new shock, giving substantially better traction and a smoother ride. All is well - except now I need to start over learning the feel of the bike.

(Also, I finally cut down the handlebars, so they fit my narrow shoulders!)

Sunday, September 20, 2009

Fall Century

I've ridden the past CRW centuries with DP and TT, until the Spring one this year which I rode alone. After learning that DP's injury was going to keep him out of this ride too, I was delighted to learn that my colleague CP was riding, and was interested in riding together. CP was one of our Deerfield crew, and is one of the few year-round bike commuters I work with. Later on he mentioned he had a friend who would join us.

As I looked forward to the event, one of my favorite rides of the year, there was a time or two when intimidation started to gnaw at me. CP has been training for triathlon, and is much younger than me. His friend is from his racing club. I have never raced and wouldn't consider it. To me, racers are another species, eager to wrestle each other for a fraction of a second, pushing each other to achievements ever further from the reach of us mortals. Would a bike commuter like me keep up across 104 hilly miles?

I did the usual hasty bike prep the day before the ride, even working in a quick wash of the frame. Then I packed everything into the car and was heading inside for the night when I remembered I wanted to check the chainring bolts, because the chain seemed to have a mote of wobble in the middle ring while riding. The sun was down, but by the car's roof light I found one bolt dead loose, and the majority not tight enough. The last one I tightened produced a snap sound, when the lip of the outer piece sheared off. These were aluminum bolts I'd "upgraded" to in the spring, to save some weight compared with the steel ones supplied by Shimano. I'd always feared aluminum bolts, and the shear was exactly where I'd feared they would break, at a sharp inside corner which makes an ideal stress riser. The only reason I trusted them is because the new Shimano cranks use aluminum, even the MTB (XT) ones. I replaced the failed one with an old steel one, and the rest will be changed out soon.

The morning of the ride was colder than forecast, 39 degrees and the first time I saw our thermometer under 40 since spring. I packed some extra clothing and headed out, passing beautiful sea smoke rising from the rivers along the way.

Right after I parked, I realized I'd left my cellphone at home. If my plan was to ride alone, I'd have gone back home to get it, then start late. Instead I redoubled my commitment to stay with CP. While the riders assembled and waited for the start, a pair of hot air balloons flew low over us, pointed out by CP. I can't imagine a more impressive send-off.

We met up with CP's friend, P, and chatted with some of their friends before the start. Then, much later than scheduled, the ride organizer gave us some advice and updates, including, 'There is a bunch of new asphalt on this route. The rest is potholes.' At the end, he staggered our start by first asking the folks who thought they'd ride it at 18MPH to go, then he worked down. Our group had been grumbling about waiting in the cold, so we went in that first wave, though we had no specific pace plan.

Around mile 30, a lot of us missed a turn, which degraded into dozens of cyclists debating which way we should go, while scouts ran both directions looking for the arrows painted on the street. I asked a man walking his dog, but when his name for the street we stood upon disagreed with my GPS, I decided he wasn't helpful. Later, someone who really knew both the roads there and the route spoke up and she led us back toward the start. We found that the turn we missed was earlier than we'd imagined, and later I realized that the dog walker was essentially right.

The kickoff speech had mentioned a short 15% climb, which is steeper than anything near my commute. In the 2 previous times I rode this route, I did not realize it had anything this steep, though I vividly recalled the two long climbs after the first water stop. Writing this with hindsight, my guess is the 15% was part of a rolling section near mile 30-40. Here I fell back behind CP and P, and started to wonder whether I'd catch up. But then I found CP stopped to take off his jacket, then P had stopped to retrieve a water bottle. We were together again!

Not long after that, I was toward the front as we started a long, shallow descent. This is about my favorite kind of riding, because it feels most like flying. I wound up at the front, then started to recognize the area. We were dropping into the Souhegan River valley, and riding along the river. I stayed in front and pulled, partly for the joy of it and partly for the contrast with my first time here. Back then, my first century ride ever (2004), I'd fallen behind my friends. This stretch has few intersections because of the river, so there were no CRW arrows to confirm I was on the right path. I'd started imagining I was lost and alone in NH. But this time I knew the water stop would be roughly the next right turn, and I was able to confidently pull till we arrived there (mile 52).

My preference at water stops is to minimize the stay, otherwise I need to warm up again. But these are social rides and P and CP knew lots of the other riders at the stop. I joined a group where a rider was saying she'd just had a 100 mile race a couple weeks ago. I was thinking, 'that's a dedicated cyclist,' when she clarified it was a running race! She made the cutoff at 30 hours (no sleep) and she reported it wasn't so bad, as long as you don't mind the beat-up feeling from all the blisters and such. I'd never even heard of an event like that - where do these people come from?

In my experience, CRW rides are happy to travel closed roads, so it didn't bother me when we ignored two different marked detours. But even I hit the brakes as we approached the sign reading "bridge closed", and saw the wall of chain link across what had become a cliff with a river running far below. Another rider found a pedestrian bridge not far away, and we rode across.

I really felt the cumulative effort in the last part of the ride. On a climb, I fell to the back of the group, and started to drop off. Then CP came back to give me a pull - and it was a good one, since he's tall and wore a water pack, so I enjoyed a big wind pocket. With his strength, we were soon near the front, and after a nice rest, I took a pull on a descent. But then the cycle repeated, as the next climb dropped me to the back again. Just as I felt I was getting dropped, we arrived at a stop at an intersection, allowing me to catch up. Mysteriously, I found myself in the lead across the intersection, until a climb. This repeated a couple more times, surprising me each time. I felt like I was putting out constant power - the little bit I could manage at that point in the ride. Were the others speeding up for the climbs and then resting on the descents?

In the end we made really good time overall. In fact, my average was half a mile per hour faster than my previous rides over this route - quite a lot in the bike world.

Overall, this was a great ride and a wonderful way to both end the summer and begin autumn.

(post script: 4 days later, my legs are starting to feel recovered.)

Thursday, September 10, 2009

Chamois Creams


Chamois creams are handy for controlling chafing, irritation caused by skin rubbing against skin. They can also be used for hot spots between the skin and pants, and are named for this.

(Historically, real leather chamois was used as a pad between the skin and clothing over the saddle. Chamois creams helped keep that leather soft and flexible, while also protecting the rider's skin. An old quick remedy for chafing on the road is a banana peel, which may account for some of the enduring fondness of cyclists for bananas.)

For years I've used the Assos product, and it served me well. Unfortunately, it was recently changed, and I don't like the new version much at all. The old stuff, shown on the left above, was light tan in color and came in a jar with red on the label. It felt just right and was made of natural ingredients. The new version, shown in the center, is light blue and comes in a black and white jar. It's mostly synthetic chemicals by my reading of the label, and isn't as nice. I've also read on the net (for what that's worth) that the new version isn't as good at preventing saddle sores, which comes down to antimicrobial properties. Like the old version, the new one is expensive and found only in bike shops.

While net surfing on the topic, I saw one comment that a couple folks were using Noxema as a chamois cream, and strongly preferred it over the new Assos. I tried it and I'm now in that camp. As with anything affecting your body, try it on a short, non-critical ride first. But after it served me well on Deerfield, I feel comfortable recommending it. It's also around 1/5th the price and available in grocery stores.

I use it at the top crease at the front of my inner thighs, where pedalling can otherwise cause friction.

(If this all sounds like an over-share, this post is partly in response to my quest for advice years ago. I worked up the courage to ask a bike shop staffer I'd spent hours with, and with whom I'd formed a good working relationship. He just mumbled something about checking my saddle adjustment and changed the subject. I hope this post can help someone.)

Tuesday, September 8, 2009

Blur LT Lower Pivot


I'm a big fan of Santa Cruz engineering. In fact, I think there are several examples of objectively better design than many of their competitors. But I have found an element of this design which makes me worry - though it has not actually failed in any way.

This frame has a bottom linkage which drops down toward the ground when the rear end is not heavily loaded. This means rocks and logs can hit it, and they do. There's a grease port (fitting) for re-greasing the bearings, and it's effectively a hook shape and smacks hard into those rocks. The swingarm is also vulnerable there. I've only ridden it through rock gardens a couple times, and it's already looking a bit rough there. The 'net has several posters who claim no one has actually damaged the grease port, but my luck tends toward things breaking if I think they can.

The top picture is my second attempt to protect this area. (The bike is upside-down.) The bottom pic is au naturel. I've started an email thread with Santa Cruz, including these pics, asking them to address this and to offer a protective plate. (I'm glad I don't have a carbon swingarm.)

Wednesday, August 19, 2009

Deerfield 100k


The beautiful scenery of the Connecticut River Valley, dirt roads and friends - all the ingredients for a memorable bike ride. This year's Deerfield Dirt Road Randonee was a blast.

We had eight riders in my group, mostly from work, and we brought a wide range of bikes to the event.


I carried four water bottles, a new record. The fourth rode in my jersey pocket.


DB brought a classic mountain bike.


CP had a homebrew semi-cross bike with a special "wide-range" double crank based on mountain bike gearing.


DH brought classic European cycling style and his wife's hybrid bike. Thanks for the French and Italian cafe music for the drive to the start!


GC modified his full-suspension hard-core mountain bike for the day.

The 100km ride starts at 9AM, which makes logistics easy but means the sun is high for the whole thing. After arriving early, we waited for almost an hour in the farm field we parked in. The forecast was for a high of 90, and I wished we could have started early.

The first dirt road climb was a shock to most of us. Riders from another group, just ahead of us, slipped their road race tires in the loose gravel and switched to walking, leaving us an obstacle course of people and bikes to try to ride through. On the other hand, we riders got a bit spread out along the trail, and we never got blocked like that again.


We spent some time on roads, along farmland and rolling hills. The terrain in the picture above made me think of giant fingers lying on the ground. We all knew we'd be riding up those hills soon.

GC, our only rider on a full suspension, had the most amazing joie de vivre of the ride. He flew by me on a loose gravel descent that made nearly everyone nervous and caused a couple crashes. In fact he bombed down every descent I saw, and even wheelied up a chunk of a switchback! If I could imagine going this distance on my MTB, I'd consider trying it - GC made it look fun.

At lunch, next to a covered bridge, we ate baked potatoes and drank what we could. PF trained me long ago to bring my "cytomix" (a blend of Cytomax and a little protein powder). Others drank what was offered at the stop, (grape?) Kool-aid. We thought Gatorade was going to be available, and a couple of our group decided to home-brew the stuff by mixing Kool-aid with the table salt set out for the potatoes. Another rider, unknown to our group, snapped a picture of us here. (I'm standing between the two yellow shirts with sunglasses on my hair while most of the rest of the group is sitting along the river nearby.)


After lunch we rode a delightful flat dirt road along a small river to let the food settle a little, then veered up into the hardest climb of the day. The top part of the hill was the worst: although the dirt transitioned to pavement, the tree cover we had enjoyed suddenly evaporated and we felt the 90 degree sun-baked heat in the utterly windless low-gear grind. But just over the crest, all was well again as we had the view shown in the topmost photo above, and a water stop with fresh produce from the farm there.


SM, above, on a 29er rigid MTB, led us a lot of the time and knew the course perfectly. I'm afraid I over-relied on his guidance, and predictably I noticed this only when I found myself alone and unsure of my location and cue sheet position.

Over the after-ride dinner, the topic of next year's ride was never far from thought. At one point I got into a rant about how I'd like to try the 112mi ride sometime, and it won't get any easier. 'If I could ride it, even just once, it would be the kind of accomplishment that would go on my tombstone!' GC added, 'maybe the same day.' That gave me my biggest laugh of the weekend.

One definition of a good ride is it leaves you inspired for next year's ride. Deerfield was a great success this way, with all of our group discussing route options, bike upgrades and nutrition for next time, starting midway through this ride.

SM took some video and compiled it into a taste of the ride. The video was shot with a hand-held Flip, and I'm impressed he could keep it as steady as he did. Thanks, SM!

For those of us dreaming of the full ride (maybe it's just me?!), a nice blog of the 112mi ride this year was posted by another rider. Sounds inspiring, but also very intimidating!

Honestly, my most ambitious idea is to ride the 112mi route until the lunch stop shared by both routes, then switch to the 65mile route, making a 93mi version. Still, that's probably not sensible unless I can train way better next year. But it would be nice to be on the road starting in the nice cool (and dark) air of the 6AM start the 112-milers get...

Thursday, August 13, 2009

Deerfield Rig


Deerfield is Saturday! A long hilly dirt road ride requires pretty big changes from the road rides I'm familiar with. I'm starting with the Independent Fabrication I've been using as my summer/long-distance bike for years now. It's the Club Racer model, which is designed to accept full fenders, and it does that by using "long reach" brakes, and having good clearance in the frame and fork.

The seatstay gap is 35mm, the limit on tire size. I'm a big fan of Vittoria tires, so for the dirt roads I picked their cyclocross tire, nominally 32mm wide but which measures 30.5mm on my rims. This size perfectly fits, with a little gap for dirt. (This would not work well in mud, and cyclocross bikes have much better clearances for this, but it should suffice here.)

Low gears are important for the hills, including the power loss of loose gravel slipping under the wheels. I favor low gears anyway, to keep my cadence high, so I setup my lowest chainring set, 26 / 42/ 52. But I swapped my 12-27 road cassette for a mountain bike 11-34 cassette to get a really low climbing gear. To do this I had to swap the rear derailleur to a MTB version, including one of the "brifterizer" hacks I build to connect my 10 speed Campy shifters to 9 speed shimano cassettes. The shifting is noisier, benefitting from more nudging than I normally need, but the range is great. (In test rides I found I need to remain seated on a steep loose climb or the wheel will slip - so I'm missing a skill and need extra-low gears to compensate.)

No rear derailleur I know of will handle the full range of gearing described above, so I locked out the large chainring. (The derailleur's bottom pulley moves back and forth as one shifts to take up the slack in the chain for the selected gears. I have a "long-cage" derailleur, able to handle the widest range, but even it has a limit.)

Water is another challenge. While there will be water stops, the organizers are recommending hydropacks so the riders can carry enough water between. I can't imagine wearing that hot thing for a long ride, so my plan is to carry 4 bottles, with 3 on the frame and one in my jersey.

This ride will rely on cue sheets more than any other ride I've ridden. So I added a handlebar bag as a cue sheet holder, but it's a classic touring accessory and I may find I like it.

Excellent Local Bike Shop

In the run up to the Deerfield randonee, my biggest ride of the year, I've been trying to get the bike set up properly and well tested. So I was alarmed to find last night, three days before the ride, that my saddle has cracked. This means not only finding a saddle fast, but I won't have an opportunity to verify the new one is installed properly, with all the fine adjustments critical for comfort on a long ride.

Let's back up a bit over two years to the start of this story. I bought a Specialized Toupe from CycleLoft in Burlington. They have a more liberal return policy than the other shops I know about (which is to say they accept a new-condition return). Around a year later, I found the saddle had cracked, with the effect of making it softer - a very bad thing on long rides. I bought a replacement right away, then later came back with the bad one. They refunded my purchase price on the original one, and said if I'd brought in the bad one, they would have just swapped it for a new one. By this time I believe I was talking to the owner, but I'm not sure. I went on to describe what I see as a design flaw in the saddle, and he mostly agreed, but also said the saddle is designed for people lighter than me. (There's no weight limit on the saddle packaging.) I parted asking whether my new one would hold up, and he said 'worst case you bring it back and get a new one each year. It's an ideal situation'. For me, ideal would be a reliable saddle, but I guess this isn't too bad.

Now return to today. Saddle in hand, I start with a random salesperson who tells me the saddle is more than a year old (so past warranty) and anyway they don't have a match in stock. (Well, they do have white, but I don't like that look. The same out-of-stock issue happened last time and I shifted to a slightly different model.) I didn't argue, but I did ask questions and wound up chatting again with the owner (I think). The three of us searched the store again for the matching saddle which their computer says they have, without luck. Then the owner says they can order the right saddle and in the mean time, he has a Toupe on his own bike which I can borrow! As he was taking apart his bike in front of me in a daze I actually said out loud, "this is like the shirt off your own back". He was saying he wanted a white one on his bike anyway, but I was so amazed that I didn't quite follow how this all works from his point of view.

Bottom line, I'm all set for Deerfield, and in a week or two they'll send me an email* to come pick up my new saddle for free. Where they could have said 'out of warranty; out of luck.' I'm a fan!

Other CycleLoft goodies: 10% off if you're a member of any bike club, and they'll put it in their computer and it becomes automatic forever. Friendly and skilled mechanics (unlike that other bike shop I go to). And my friend DP says they just did a great job servicing his Campagnolo brifter shift discs - work few bike shops will attempt - and they did it for far less than an online shop in CT that I'd figured I'd use when it came time for mine to get serviced.

* email itself is amazing because even this year I've had trouble finding a bike shop that will do email.

Saturday, July 18, 2009

Bumblebee


The new bike is finally together. Unfortunately I haven't really ridden it yet as a stomach bug knocked me out just as our two months of drizzle came to an end. Any day now...

The yellow frame with black parts has become my signature, as well as my favorite of the frame colors. Where I associate the colors with friendly pollinators, A sees Pittsburgh sports teams (Go Steelers, Penguins, etc!) and MF sees the Boston Bruins. I think I'm missing a gene.

(This bike uses one of those new-fangled external bearing bottom brackets. I just don't like it, though it should suffice. I wouldn't put one on a road bike. Next time: ISIS or Octalink.)

Tuesday, July 7, 2009

New Bashguard


I once again cut down a Nashbar bashring to make it smaller and lighter. (The first one was last year.) I took pictures this time. The resulting part weighs 99g, and has a radius 0.15" smaller than the original.

First, cut down the radius. This is the only functional change, adding clearance for rocks.


Next, I drill out some excess metal to lighten the part. The finished hole size is big, 3/8", because small holes don't achieve much savings.


At the end I pared out some excess metal near the edge, using a ball mill at the end to provide a big inside radius to minimize the chance of cracking the aluminum after a big bash.

Wheelbuild, Concluded

I finally finished the wheels last night. Whew! I'm a perpetual beginner/intermediate at this because I go 2-3 years between builds. The bottom line is I'm happy with how they went together and I think they'll serve well, but I've not ridden them yet.

Below is a table of the wheel weights, in case anyone wants to borrow bits of the spec. Note that I strove first for strength and maintainability, using brass nips and mostly (5/8ths) the strongest spoke type. One could build a lighter wheel by giving up some of this longevity.

Bare wheels (no skewers, rotors, cassette): Front = 706g, Rear = 845g. Total 1551g. (This is the number to compare with factory-built wheelsets.)

Full wheels except tires & rim strip: Front = 899g (160mm rotor), Rear = 1319g (140mm rotor, XT cassette).

Rim tape is Stan's yellow tape, claimed 5g per wheel.

Monday, June 29, 2009

Disc Wheel Lacing

I'm building up a new wheel set, my first using disc brakes. These brakes affect the lacing design because the torque applied by the brakes is carried by the spokes to the rim and tire. In contrast, rim brakes (as on most road bikes) apply no torque at all to the spokes.

While I want the wheel set to be strong and reliable, I also want to optimize its weight against the strength required for each part of the wheel. The spokes are a significant part of the weight, and they are available in different thicknesses. I made up a lacing pattern which uses two different spoke thicknesses in different parts of the wheel.

The front wheel has the most complex pattern. The only torque these spokes carry is during braking, so it's all in one direction. I'm using the thinnest spokes in the positions that do not increase in tension when the brake is applied. The thin spokes are also laced inside the hub flanges. The thicker spokes, which carry the brake tension, are laced outside the flanges. This provides a few benefits:
  • When braking, these high-tension spokes are outside the flanges, forming the widest possible bracing angles and therefore the stiffest wheel in terms of resisting side loads.
  • The thicker spokes are the ones furthest from the center plane, so the tip of a stick is more likely to hit a thick, strong spoke instead of a weaker, thin one.
  • The simple rule of thin spokes on the inside of the flange makes them easy to track. The thin spokes must be tensioned more carefully because they can twist or "wind up" more than the thicker ones, and they must be kept untwisted. (I've also marked the thin ones with a pen during the wheel build.)
The rear wheel uses thin spokes only in the same, non-brake-tension position, only on the brake side of the wheel. The drive side (with the cassette gears) has thicker spokes in both directions, to handle both pedalling and brake torques. (I'm treating these hubs as capable of carrying significant torque through the hub shell to the opposite flange, but I consider that torque important only for braking. My pedalling forces can be carried on just the drive side of the rear wheel.)

The main downside to optimizing the lacing this way is complexity. It's easy to put the wrong spoke in a given position. And more spokes need to be purchased and tracked - for example, there are four different spoke sets in the front wheel. (Two thicknesses x a different length for each side.) The rear wheel has three different spoke sets.

I'm rusty enough at wheel building that I made a few mistakes at the beginning, but now both wheels are laced and I've started tensioning the rear. I'm happy with the result so far, and am excited to ride them!

[Notes: The spokes are DT Competition (2.0/1.8mm) and DT Revolution (2.0/1.5mm). All lacings are three-cross (3X). All spoke nips are brass for strength and resistance to corrosion. Hubs are Shimano XTR which are available near half price these days as they seem to be out of favor, and I've had good experiences with my Shimano hubs over many years. I think they're a good value now. Also, I like the loose ball design for hubs because I know how to rebuild and preload them - I'm not excited by the trend toward cartridge bearings. On the other hand, they have the lowest flanges I've seen on a disc hub, so they demand high spoke tension and are probably best for XC-only riding. The rims are Stan's Olympic ZTR, a lightweight and slightly radical offering from a new small manufacturer. I plan to run these wheels tubeless, at least at first, and these rims are designed to work that way or with tubes. Thanks to GC for his great info and experience on these rims.]

Wednesday, May 27, 2009

Brewster


Friday evening, the start of Memorial Day weekend, was my third annual ride from home to Brewster on Cape Cod, via a fast ferry from Boston to Provincetown. The bike setup was based on the century 0f the previous weekend - for example, the fenders were still on. I added the big headlight and the relatively new Garmin HCx GPS.

As you may recall, I broke our previous GPS on a long ride last year, apparently from vibration through the handlebar mount. That was disappointing given that I used a handlebar mount made by Garmin, exactly as intended. This time I was determined to be more conservative, even though the new unit appears stronger than the old. I decided upon a couple layers of vibration dampening before the handlebar mount. First, I moved it to the end of my (carbon) handlebar so the length of this tube can deflect a bit to absorb bumps. My hands and upper body help dissipate shock and vibration here, especially when I'm "in the drops" as I am most of the time. This vibration dampening is the main reason I use a carbon handlebar. After that, I attached the GPS outside the foam handlebar tape, so the tape itself is a cushion. On the tape I mounted a short extender piece, which then had more handlebar tape on its tip, then the Garmin handlebar mount. And I tried not to compress any of the handlebar tape more than necessary, so the foam would retain its softness.

I left home after work and made good time down to Cambridge. I started the GPS as I approached the end of the bike trail, but it was unable to acquire satellites as I rode. At the end of the trail I stopped the bike and restarted the GPS, while I reworked the GPS mount. (It proved too loose on one layer of handlebar tape, so the whole unit kept flipping upside down.) The GPS locked normally this time, and I continued across Cambridge and Boston toward the ferry dock. One segment of the trip is still a puzzle: the bumper-to-bumper stopped traffic in front of the museum of Science - this time I tried the leftmost lane for a while, and that worked pretty well, but the sidewalk is likely the fastest route if I were willing to ride it.

My hopes for the new GPS included improvements in the routing algorithm. Both old and new units have a mode for "bicycle", but the old one didn't seem to act much different from "car" mode. Around a mile from the ferry dock the new GPS gave me a different turn from last time, evidence of algorithm progress! I landed at a security kiosk I'd never seen before, in front of a beautiful arch reading "World Trade Center". The route is already more scenic! Immediately after passing the arch, though, I found why I'd never seen this before: I was two floors above ground level! Rather than explore, I walked down polished stone stairs with my bike, stepping gingerly in my awkward bike shoes with their metal cleats. I'll take the old route next time.

After a quiet ferry ride, I started the second part of the ride as the sunlight waned. In Provincetown, the GPS periodically tried to divert me to Route 6, instead of the quieter 6A I've used before. The good bit of preparation I did included putting last year's route on the screen of this new GPS, so I could compare it with the GPS advice. (The bad part of my prep was neglecting all forms of paper maps and instructions.) After I merged with 6, the GPS started finding little zig-zag roads to divert me from 6. This must be a new "bicycle" algorithm - it was nuts. Route 6 is not very bad (PMC uses a lot of it), and it's obviously faster and smoother than the side roads. It's also pretty obvious that zigzags are not a safety enhancement since most of them require crossing the highway. After I figured out what was happening I just used the 2008 route and stayed on 6.

It was dark when I reached the transition to the Cape Cod Rail Trail, roughly my halfway point on the Cape. This was a lovely ride like last year, though very different in character because the weather was great this time. Here I turned off the GPS routing entirely, leaving it as a map only, and I turned off my other beeper too. No more gadgets or cars, just trees and wildlife - this was delightfully peaceful. A line of radio towers looked like an alien invasion as I neared then passed through the plane of their aircraft warning lights. I chased a coyote, rabbit and raccoon along the trail. The rabbit was the only foolish one - it veered away from my path then reconsidered and jumped high in the air in front of me. A quick stop prevented impact, but I can't figure out what it was thinking. Why not wait till I'm past to cross the trail? Maybe it recognized me as a mountain biker and offered me a bunny hop salutation?

This segment ended quickly too, and the ride was done. I've been buying water between P'town and the trail head, but from now on if I'm on this year's pace I'll skip that.

I concluded the GPS is vulnerable to vibration, preventing its lock on the bike trail. While it worked fine after lock, this makes me nervous that something is moving inside the unit, perhaps the antenna. This sounds like a recipe for metal fatigue, so I'm going to try to figure a way to give it yet more isolation from vibration. Ugh. Also, next time I'll try the "car" routing algorithm instead of "bicycle", and then constrain it to minimize highway use, etc.